

The Complete, Up-to-Date Guide to the Multimeter (AVO Meter) — Types, Uses, Correct Operating Procedure, and Electrical Safety Rules
Need to inspect a home electrical circuit, test an old battery, or diagnose a fault in an electronic device? All of these tasks — and many more — start with a single tool that no electrician or electronics engineer can do without: the Multimeter (AVO Meter).
I'm Mostafa Amaan , and I've been writing for Valley4Techs for years, breaking down technical concepts into plain language. In this comprehensive, up-to-date guide we'll cover everything about the multimeter from A to Z: what it is, its types, detailed uses, a correct step-by-step operating procedure, and the most important electrical safety rules. Whether you're a beginner taking your first steps — in which case you'll also want to read our tips for learning electronics as a beginner — or an experienced technician, you'll find exactly what you need right here.
What Is a Multimeter (AVO Meter)?
A multimeter — also known as an AVO meter or multi-tester — is a multi-function electrical measuring instrument used to measure three core electrical parameters in electrical and electronic circuits:
- A — Amps: measures electric current
- V — Volts: measures voltage (potential difference)
- O — Ohms: measures electrical resistance
The name AVO Meter comes directly from those three initials. The device has evolved enormously since its invention: modern models support capacitance measurement, transistor testing, temperature measurement, diode testing, and some advanced models even include a built-in oscilloscope display. For a deeper understanding of the electronic components a multimeter tests, read our article on semiconductors .
Types of Multimeters
Multimeters fall into two main categories, each with its own characteristics and advantages:
1. Digital Multimeter (DMM)

The digital multimeter — the most widely used type today
Readings are displayed numerically on an LCD or LED screen. This is by far the most common type in use today. Key advantages:
- Very high measurement accuracy (up to 4 decimal places)
- Readings are read directly and unambiguously from the display
- Auto-Range feature available on modern models
- Some models can store and export readings
- Relatively low cost for the accuracy provided
2. Analog Multimeter (AMM)

Analog multimeter with a moving-needle pointer
Uses a moving needle over a graduated scale and is still employed in certain specialized applications. Some seasoned technicians prefer it for visualizing dynamic changes in electrical signals more naturally. However, reading it accurately requires practice and skill.
Parts of a Multimeter and Their Functions
Before learning how to use the device correctly, familiarize yourself with its main components:
| Component | Function |
|---|---|
| Display (LCD) | Shows the measured value numerically or as a needle deflection |
| Rotary selector switch | Selects the measurement type (voltage / current / resistance) and range |
| COM jack (black) | Common (negative) terminal — always connect the black probe here |
| VΩmA jack (red) | For measuring voltage, resistance, and small currents |
| 10 A jack | For measuring large currents (up to 10 A) |
| Test probes | Red (+) positive, black (−) negative — touch the circuit under test |
| Transistor socket (hFE) | Tests NPN and PNP transistors and reads the gain factor (hFE) |
Detailed Uses of the Multimeter
The multimeter's versatility is what makes it indispensable. Here are the most important things you can do with it:
1. Continuity Test (Buzzer Mode)
Continuity testing is one of the most frequently used functions in any repair shop. The meter uses its internal battery to form a simple circuit. When you place both probes on the ends of the conductor or track you want to check:
- Beep + indicator light: the conductor is intact with no break
- No beep, no light: there is an open circuit (broken wire or PCB track)
This mode is used to test: fuses, wires, PCB tracks, coils, zero-ohm resistors, diodes, capacitors, transistors, and MOSFETs. If you're diagnosing a PC-specific issue, you may also find Windows' Memory Diagnostic Tool for checking RAM errors useful alongside the multimeter.

Testing fuses in continuity/buzzer mode
2. Voltage Measurement (V)
There are two types of voltage you can measure:
a) DC Voltage (DC-V): This is a steady, constant
voltage — such as that from batteries or phone charger outputs.
Set the rotary switch to
DC-V
or
———V,
then choose a range just above the expected value.
b) AC Voltage (AC-V): This is the alternating
voltage supplied by the power grid — household mains. Typical
values are 120 V in North America and
230–240 V in the UK, Europe, and Australia. Set
the switch to
AC-V
or
~V.
3. Resistance Measurement (Ω)
To measure the resistance of any component, set the switch to
Ω
and select the appropriate range. Place both probes across the
component.
Always disconnect power from the circuit completely before
measuring resistance
— otherwise you will get false readings and risk damaging the
meter.

Measuring electronic resistors
4. Current Measurement (A)
To measure current, the multimeter must be connected
in series with the circuit — meaning the current
flows through the meter itself. Set the switch to
mA
or
A
depending on the expected current level.
5. Diode Test
Most modern multimeters include a dedicated diode test mode
(⊳|).
In forward bias, a healthy silicon diode should read between
0.5 V and 0.8 V. In reverse bias, it should
display "OL" or "1" (open
circuit). If the diode reads zero in both directions, it has
failed (short circuit).

Testing diodes
6. Transistor Test (hFE)
Most digital multimeters include a dedicated transistor socket for testing NPN and PNP transistors and reading their current gain (hFE). Insert the transistor into the correct socket for its type and the display will show the gain value directly. For a deeper dive into the processors built from these components, check out our article on the differences between CPU, GPU, and APU .
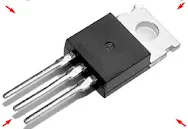
Testing NPN/PNP transistors
7. MOSFET and Capacitor Testing
MOSFETs can be tested using diode mode or resistance mode. Capacitors require a charge/discharge test. Some advanced multimeters include a dedicated capacitance function that reads the value directly in farads (F).
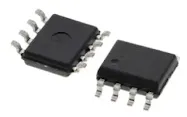
Testing MOSFETs
How to Use a Multimeter — Step by Step
Here is a practical, beginner-friendly guide to using a digital multimeter correctly and safely:
📍 Measuring Battery Voltage (Practical Example)
-
Insert the black probe into the
COMjack. -
Insert the red probe into the
VΩmAjack. -
Turn the selector to
DC-V(for batteries). - Choose an appropriate range — for a 1.5 V battery, select the 20 V range.
- Touch the red probe to the positive (+) terminal and the black probe to the negative (−) terminal of the battery.
- Read the value directly from the display.
Example: standard AA battery
  Expected reading : 1.5 V  (new battery)
  Reading < 1.2 V  : battery is weak — replace soon
  Reading < 0.9 V  : battery is fully depleted
📍 Measuring Mains AC Voltage
-
Set the switch to
AC-Vor~V. - Select the 750 V range to be safe (mains voltage can spike above its nominal value).
- Insert both probes into the outlet's slots (polarity doesn't matter for AC).
- Normal reading: ~120 V (North America) or ~230–240 V (UK, Europe, Australia).
Detailed Look at the DT-830L
The DT-830L is one of the most popular digital multimeter models worldwide, valued for its low price and wide feature set. Here is everything you need to know about it:
| Specification | Value |
|---|---|
| DC Voltage (DC-V) | 0 – 500 V (5 ranges) |
| AC Voltage (AC-V) | 0 – 500 V (2 ranges) |
| DC Current (DC-mA) | 0 – 200 mA |
| Resistance | 0 – 2 MΩ (5 ranges) |
| Transistor testing | NPN and PNP |
| Power supply | 9 V battery (PP3 / 6F22 type) |
| Continuity buzzer | ✅ Built-in |
Watch the video walkthrough below to see the DT-830L in action:
Comparison: Digital Multimeter vs. Analog Multimeter
| Criterion | Digital (DMM) | Analog (AMM) |
|---|---|---|
| Accuracy | ✅ Very high | Moderate |
| Ease of reading | ✅ Direct from screen | Requires interpretation |
| Diode testing | Good | ✅ More nuanced (preferred by experts) |
| Dynamic signal tracking | Difficult (digits change too fast) | ✅ Better (needle moves smoothly) |
| Price | ✅ Cheaper at entry level | Varies |
| Best suited for | Beginners and professionals alike | Specialist experts |
Electrical Safety Rules When Using a Multimeter
Safety first — always. Here are the most important rules to follow without exception:
- Always verify the range setting before connecting the probes — never put the meter in current mode and measure high voltage.
- Disconnect power before measuring resistance or running a continuity test on any circuit.
- Use fully insulated probes — keep your fingers away from the metal probe tips at all times during a measurement.
- Never exceed the maximum range stated on the meter for any parameter.
- Remove the red probe first after a measurement, then the black.
- Do not measure voltages above 500 V unless you are using a meter rated for that level together with appropriate personal protective equipment.
- Store the meter in a dry location, away from moisture and extreme heat.
Common Multimeter Mistakes — and How to Avoid Them
Many beginners fall into these traps. Know them so you don't repeat them:
| Mistake | Consequence | Correct approach |
|---|---|---|
| Measuring voltage while in current (A) mode | Immediate meter burnout | Check the selector position before every measurement |
| Measuring resistance with power still on | False readings + possible meter damage | Always disconnect power first |
| Selecting a range lower than the actual value | Blown internal fuse or meter damage | Always start at the highest range, then step down |
| Leaving the meter switched on when not in use | Battery drains quickly | Prefer meters with auto-off, or always turn it off manually |
| Reversing probe polarity on DC | Negative reading (incorrect) | Red to positive (+), black to negative (−) |
Did you find this guide useful?
Join hundreds of subscribers and get the latest articles and tutorials delivered straight to your inbox.
Yes, subscribe me! ✉️🔒 Your privacy matters. We never send spam.

We'd love to hear your thoughts! Leave a comment below
and share your experience or questions.